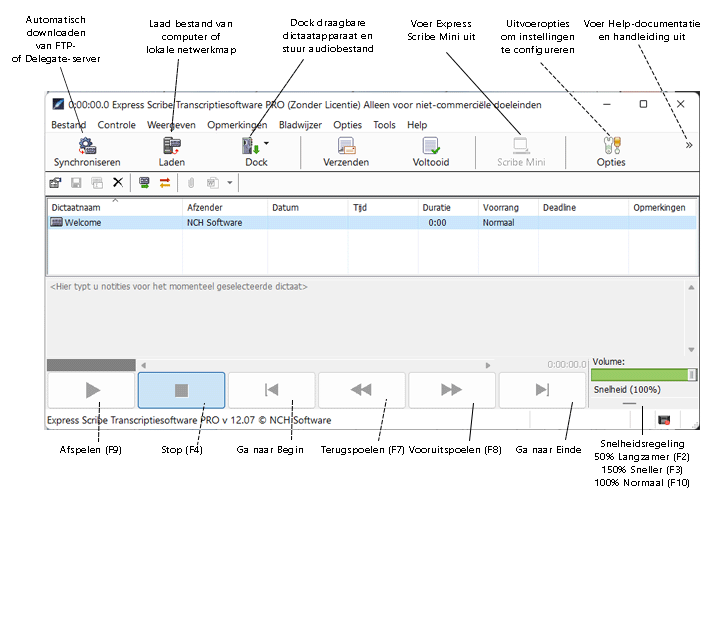
Express Scribe Tutorial 2: Basisregeling Kijk voordat je verder gaat naar de onderstaande schermafbeelding en zoek de posities van alle interfacebedieningselementen.
Voor meer informatie over Het instellen van je voetpedaalregeling en opties klik hier

Stap 1 van 6: Een Audiobestand Laden Express Scribe geeft opnames weer die lijken op tapes. Elke opname wordt weergegeven met details over wie het bestand heeft gemaakt, wanneer het is gemaakt, de lengte van de opname, notities en de huidige locatie. Er zijn drie opties om audiobestanden in je Express Scribe-programma te laden. - Automatisch/Sync: Je kunt Express Scribe zo instellen dat het op gezette tijden een FTP-server, lokaal netwerk of computermap en Express Delegate server controleert op nieuwe dictaten. Het programma laadt automatisch nieuwe dictaten die op het opgegeven pad worden gevonden. Stel het automatisch laden in op het tabblad Inkomend in het dialoogvenster Opties.
- Handmatig Laden: Laad vanuit een lokale computermap, netwerk of CD door op de knop Laden te klikken in de hoofdinterface. Je kunt dan op je computer en netwerkverbindingen zoeken naar je audiobestand.
- Dock: Zet audio rechtstreeks over van een draagbaar apparaat naar Express Scibe. Er zijn twee opties, een audiokabelmethode waarmee je audio kunt opnemen van een analoge bron zoals een cassettespeler, of audiobestandoverdracht voor apparaten die via USB op je computer kunnen worden aangesloten.
Stap 2 van 6: Een Opname Afspelen Doe een van het volgende om een opname af te spelen: - Druk op F9 om het bestand af te spelen en druk op F4 als je wilt stoppen.
- Klik op de knop Afspelen onderaan je scherm om het bestand af te spelen en klik op de knop Stop (Een zwart vierkantje) als je wilt stoppen.
- Druk op het middelste pedaal van uw voetpedaal om het afspelen van het audiobestand te starten. Laat los of tik snel om de audio te stoppen. Voor meer informatie over Het instellen van je voetpedaalregeling en opties klik hier
Probeer nu een opname af te spelen. Gebruik je muis om de opname "Welkom" te markeren en druk op de afspeelknop. Als je niets hoort, open dan Opties, ga naar de Afspelen en controleer of de juiste geluidskaart is geselecteerd en verhoog het volume. Als je nog steeds niets hoort, vraag dan je lokale computertechnicus om de geluidskaart op je computer te controleren. Stap 3 van 6: Terug- en vooruitspoelen in de opname Toetsenbord en Sneltoetsregeling - Houd F7 ingedrukt om de opname terug te spoelen.
- Houd F8 ingedrukt om de opname snel vooruit te spoelen.
- Druk op de toets Home om direct naar het begin te gaan.
- Druk op de toets End om direct naar het einde te gaan.
Spoel nu terug door F7 ingedrukt te houden. Stap 4 van 6: Wijzig het Formaat van het Venster Express Scribe maakt verschillende weergaven van de applicatie mogelijk. - Volledige Grootte: De hoofd- en kleine werkbalkpictogrammen zijn aanwezig, de lijstweergave van het dicteerbestand, de besturingselementen voor afspelen en de sectie Notities.
- Afspeelregeling: Door de rechterbenedenhoek van de toepassing naar de linkerbovenhoek te slepen, kunt u een weergave maken die niet de werkbalken Main en Small of de sectie Notes bevat. Hierdoor blijft u over met de dicteerlijstweergave en de afspeelregelaars.
- Mini: Klik op de knop Scribe Mini op de hoofdwerkbalk om Express Scribe te verkleinen tot ongeveer een inch.
- Aangepast: Je kunt je weergave van Express Scribe aanpassen door naar de menu Weergave te gaan en de pictogrammen, knoppen en werkbalken die je wilt zien of verwijderen te selecteren of deselecteren.
Stap 5 van 6: De Opname Typen Selecteer de opname die je wilt uittypen en druk op de afspeelknop. Als het typemachineblok niet zichtbaar is, selecteer dan het menu "Beeld" bovenin je scherm en klik met de linkermuisknop op "Typemachine weergeven". Klik met de linkermuisknop in het typpad om te beginnen. Je kunt ook typen met elk Windows tekstverwerkingsprogramma, waaronder Microsoft Word, Corel Wordperfect en Lotus Wordpro, terwijl Express Scribe op de achtergrond draait. Als je een tekstverwerker gebruikt, moet je systeembrede sneltoetsen gebruiken zodat Express Scribe kan worden bediend terwijl het op de achtergrond is. Je kunt ook een voetpedaal gebruiken. Stap 6 van 6: Verzending Typen Wanneer je klaar bent met het uittypen van een bestand, kun je het per e-mail versturen naar degene die het bestand heeft gedicteerd of je kunt het bestand gewoon markeren als Gereed. Om een bestand per e-mail te verzenden: - Druk op Ctrl+D om het bestand per e-mail naar de afzender te verzenden.
- Klik op het pictogram Verzenden op de kleine werkbalk.
Als je het document hebt getypt met een tekstverwerker (bijv. Microsoft Word), kun je het documentbestand bij de e-mail voegen (klik op Bladeren). Om het bestand te verwijderen uit de lijst met huidige bestanden (zonder antwoord per e-mail aan de afzender), doe je het volgende:
- Druk op Ctrl+N voor Klaar
- Klik op het pictogram Gereed op de kleine werkbalk
Als je het bestand moet herstellen om het te wijzigen: - Druk op Ctrl+O.
- Klik op het pictogram Herstel Oude Dictees op de kleine werkbalk
Volgende: Tutorial 3 - Ontdek Geavanceerde Functies >>> Klik Hier >>> | 